isync is a command line application that can synchronize a remote IMAP account (like a Fastmail or Gmail account) with local maildirs. This post will show you how to use isync to make a local backup of your Fastmail and Gmail accounts.
isync is quick to install and configure and works great.
The project is called isync but the actual command line application is mbsync
because massive changes were once made to the user interface.
isync can do two-way synchronization of your IMAP and local maildirs.
It even allows fine-grained control of which types of changes get synced
(new messages and folders, deletions and flag changes)
in which direction(s) and on a per-folder basis.
See man mbsync for the details and for an explanation of the
“account”, “store” and “channel” concepts that you’ll see in the .mbsyncrc file below.
In this post we’re going to be using isync to make a read-only backup of your IMAP accounts: changes will be synced from your Fastmail and Gmail accounts to your local filesystem but not the other way round, so there’s no chance of isync accidentally deleting mail from your Fastmail or Gmail account if something goes wrong with the local copy.
Install isync
On Ubuntu it’s just:
$ sudo apt install isync
Configure isync
You need to create an ~/.mbsyncrc file before isync will work.
Here’s an ~/.mbsyncrc to backup a Fastmail account and a Gmail account to a local ~/Mail folder:
# ~/.mbsyncrc

CopyArrivalDate yes  # Don't mess up message timestamps when moving them between folders.
Sync Pull            # Download changes only, don't sync local changes up to the server.
Create Near          # Automatically create new folders in the local copy.
Remove Near          # Automatically remove deleted folders from the local copy.
Expunge Near         # Expunge deleted messages from the local copy.

IMAPAccount fastmail
Host imap.fastmail.com
User YOUR_USERNAME@fastmail.com
PassCmd "pass mbsync/fastmail"
SSLType IMAPS

IMAPStore fastmail-remote
Account fastmail

MaildirStore fastmail-local
Path ~/Mail/Fastmail/
Inbox ~/Mail/Fastmail/Inbox
SubFolders Verbatim

Channel fastmail
Far :fastmail-remote:
Near :fastmail-local:
Patterns *
SyncState *

IMAPAccount gmail
Host imap.gmail.com
User YOUR_USERNAME@gmail.com
PassCmd "pass mbsync/gmail"
SSLType IMAPS
Pipelinedepth 1
Timeout 60

IMAPStore gmail-remote
Account gmail

MaildirStore gmail-local
Path ~/Mail/Gmail/
Inbox ~/Mail/Gmail/Inbox
SubFolders Verbatim

Channel gmail
Far :gmail-remote:
Near :gmail-local:
Patterns *
SyncState *
The Pipelinedepth 1 slows isync down by preventing it from having multiple
IMAP commands in flight at once. This is necessary to prevent isync from
hitting Gmail’s bandwidth quotas and triggering this error message:
IMAP error: unexpected BYE response: [OVERQUOTA] Account exceeded command or bandwidth limits.
I found that I only needed this when downloading a large amount of email at once,
such as during the initial download of my whole Gmail account. I was able to
remove the Pipelinedepth 1 after that and it has been working fine. Removing
Pipelinedepth 1 doesn’t seem to make mbsync gmail run any faster for me
though: without knowing how isync works internally I’m guessing this might be
because I have a lot of maildirs but not much new mail to download in any one maildir.
The Timeout 60 increases isync’s IMAP connect and data timeouts from the
default of 20s. I found that this got rid of some timeout errors I was seeing
from Gmail.
Create Fastmail and Gmail app passwords
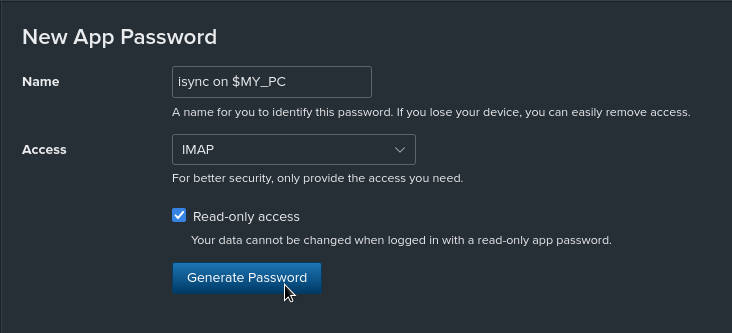
You need to create a Fastmail app password for isync to access to your account with. In Fastmail’s web interface go to /settings/security/devicekeys/, unlock the interface, and click New App Password. You can create an app password with IMAP access only and with read-only access as an extra protection against isync accidentally deleting your mail. See Fastmail’s docs for more on creating app passwords.

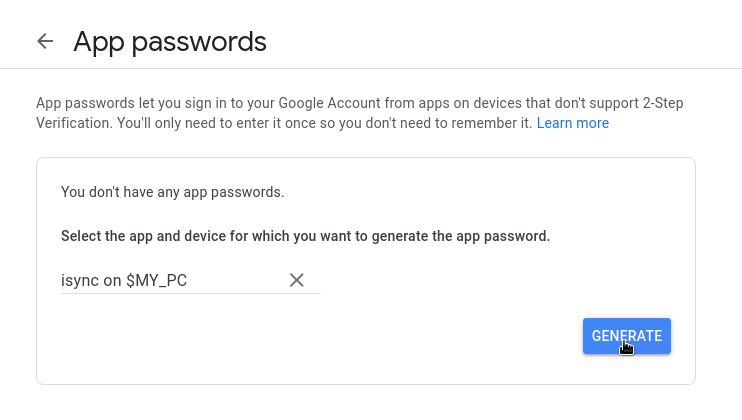
For Gmail you have to go to myaccount.google.com/security/ and click on App passwords to create one. See Google’s docs on app passwords. You also need to select Enable IMAP in your Gmail settings before isync will work, see Gmail’s IMAP docs for details.

Install pass and add the app passwords to it
We’re going to use pass to store the Fastmail and Gmail app passwords in encrypted files for isync to read:
-
Install
pass:#! console $ sudo apt install pass -
Create a GPG key that’ll be used to encrypt the passwords:
$ gpg --full-generate-key -
Initialize
passwith the GPG key:$ pass init <GPG_KEY_ID>
If you’re not sure what the GPG key’s ID is you can run gpg --list-secret-keys to see.
- You can now optionally run:
$ pass git init
If you have Git installed and want pass to automatically keep history in a git repo.
- Add the Fastmail app password to
pass:$ pass insert mbsync/fastmail
Paste in the password when asked.
- Add the Gmail app password to
pass:$ pass insert mbsync/gmail
You should now be able to read the app passwords with pass mbsync/fastmail or pass mbsync/gmail. These are the commands that the .mbsyncrc file above uses
to get the passwords.
Create the empty local maildirs
isync won’t create these so you have to do it manually:
$ mkdir -p ~/Mail/Fastmail ~/Mail/Gmail
Run mbsync
Now to download all of your email just run:
$ mbsync -a
You can re-run the command at any time to update the local copy.
You can also download only Fastmail or only Gmail with mbsync fastmail or mbsync gmail.
The command’s output looks like this:
C: 0/2 B: 5/173 F: +0/0 *0/0 #0/0 N: +23/422 *0/0 #0/0
-
The
C: 0/2is the number of channels that it has finished syncing. (So0/2means it has finished0channels so far, so it’s currently syncing the first channel.) -
The
B: 5/173means that it has so far finished syncing5out of173mailboxes. (173is the count of all mailboxes to be synced, across all channels.) -
The
F: +0/0 *0/0 #0/0counts the number of messages synced up to the far copy:+0/0is the number of messages added,*0/0is the number of messages whose flags have been updated, and#0/0is the number of messages deleted. These are all0/0because we’re downloading changes only, we’re not syncing changes up to the server. -
N: +23/422 *0/0 #0/0is the same three counts of message changes synced down to the local copy:+23/422messages added,*0/0messages with flags updated, and#0/0messages deleted so far.
The totals change as isync runs.
For example when isync begins syncing the first channel and connects to the
first IMAP account it finds out about the number of mailboxes in that count so it
displays B: 0/173.
When it finishes syncing those 173 mailboxes isync starts syncing the next
channel and connects to the next IMAP account and finds out about the number
of mailboxes in that account so the B section changes to B: 173/502.
The F and N totals behave similarly as mailboxes are opened and new
messages to be synced are discovered.
If you run mbsync with --verbose it’ll print more detailed information
about what’s happening. As well as log messages about connecting and logging in
to IMAP accounts it also prints several lines for each mailbox synced.
For example this shows it creating the lists/isync-devel folder in the local
(“near”) maildir and downloading 422 messages into it:
Opening far side box lists/isync-devel...
Opening near side box lists/isync-devel...
Creating near side box lists/isync-devel...
Maildir notice: no UIDVALIDITY, creating new.
Loading far side box...
Loading near side box...
near side: 0 messages, 0 recent
far side: 422 messages, 0 recent
Synchronizing...
C: 0/1  B: 16/176  F: +0/0 *0/0 #0/0  N: +422/422 *0/0 #0/0
This gives you detailed information about what was synced up and down for each folder. But if you have a lot of folders it produces a lot of output which can hide any errors or warnings.
Errors from Gmail
I got a couple of errors during the initial big download of my Gmail account. This kept happening:
IMAP error: unexpected BYE response: System Error
If you restart the mbsync command it’ll continue for a while longer and then the error will happen again,
so you can just keep restarting it and eventually it’ll finish the download.
Having isync crash and restarting it seems to produce this warning as well:
Warning: lost track of 39544 pulled message(s)
I was told on the isync mailing list (back in 2016) that this most likely doesn’t mean anything and at worst could mean some duplicate mails.
After getting through the initial download I haven’t had any of these errors from Gmail again. I never got the errors at all with Fastmail.
Read the local copy with Mutt
Once you’ve made a local copy of your email you can read the ~/Mail folder with a local mail client like Thunderbird or Mutt.
To install Mutt run:
$ sudo apt install mutt
You can now just run mutt -Rf ~/Mail/Fastmail/Inbox/ to open your Fastmail inbox in read-only mode.
But it can be convenient to create a ~/.muttrc file to avoid having to pass arguments on the command line.
Here’s a minimal example:
# ~/.muttrc

set read_only

set spoolfile=+Fastmail/Inbox
set mbox=+Fastmail/Archive
set record=+Fastmail/Sent

set header_cache=~/.muttcache
set message_cachedir=~/.muttcache

macro index,pager G "!mbsync -a\n"
The set read_only tells Mutt to work in read-only mode (for example Mutt won’t let you delete messages).
Since isync isn’t going to sync any changes up to your Fastmail and Gmail accounts it makes sense to tell Mutt not to make any changes to the local copy.
The spoolfile, mbox and record settings tell Mutt where to find your inbox, archive, and sent folders.
For example Mutt will open ~/Mail/Fastmail/Inbox by default when you launch it. Of course Mutt isn’t going
to be adding any messages to the archive or sent folders when in read-only mode but you can
still use Mutt’s mailbox shortcuts for these special folders to
open them easily. For example you can summon the Open mailbox prompt (c) and enter
!, > or < to open your inbox, archive folder or sent folder.
The header_cache and message_cachedir settings tell Mutt to use a ~/.muttcache dir to speed up re-opening and searching large folders.
You should create this directory before launching Mutt for the first time: mkdir ~/.muttcache.
Finally the macro at the end binds capital G to run mbsync -a from within Mutt.
Now you can just launch mutt without command line arguments:
$ mutt