A simple way to use GitHub Actions to build your Python package, bump the version number, and publish it to GitHub releases and PyPI.org all with a single click of a button in the web interface.
When I want to publish a new release of one of my Python packages
I just browse to
my release.yml workflow in the Actions tab
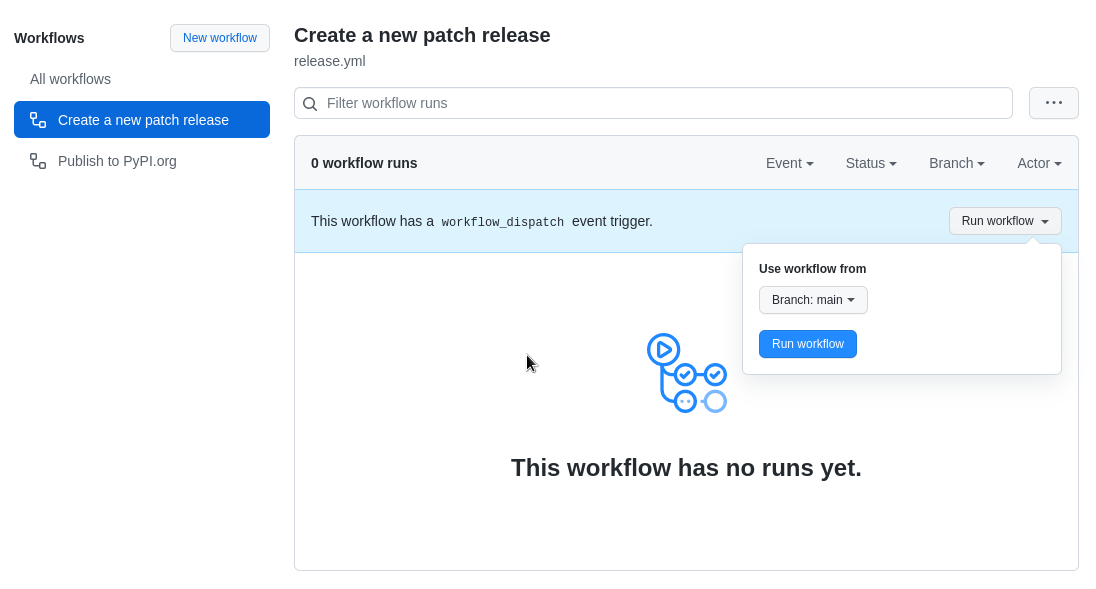
and click the Run workflow button:
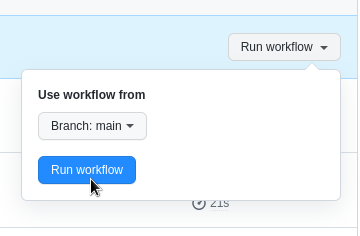
This runs a GitHub Actions workflow that increments the patch version number, creates a new GitHub release with auto-generated release notes, creates a corresponding git tag, and publishes the release to PyPI:

If I feel like it I can create a new release manually using GitHub’s web interface instead. This allows me to choose my own version number (in case I want to bump the major or minor version instead of the patch version) and lets me write my own release notes (or I can use the Auth-generate release notes button to get GitHub’s auto-generated release notes). Manually-created releases still trigger the GitHub Actions workflow that builds the package and uploads it to PyPI:
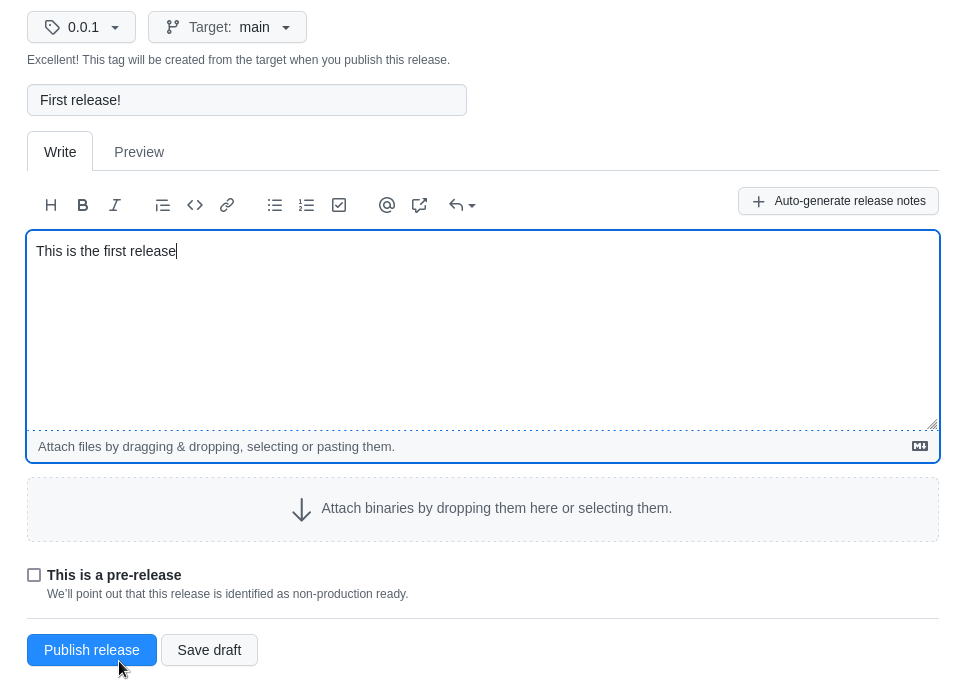
In fact GitHub releases created by any means trigger the package build and
upload workflow. For example I could run GitHub CLI’s gh release
create command from any
directory on my local machine. This doesn’t require me to have a local copy of
the project or to have anything setup locally other than GitHub CLI itself:
$ gh release create --repo seanh/gha-python-packaging-demo --generate-notes 0.0.1
https://github.com/seanh/gha-python-packaging-demo/releases/tag/0.0.1
The --generate-notes option uses GitHub’s auto-generated release notes again
or you can use --title '<RELEASE_TITLE>' and --notes '<RELEASE_NOTES>' to
enter your own release title and notes (or --notes-file <PATH_TO_FILE> to
read the release notes from a file, or --notes-file - to read them from stdin).
The rest of this post will walk through setting this up. It’s all very simple and easy…
The demo repo
We’re going to be using github.com/seanh/gha-python-packaging-demo/ as an example. The example repo contains a Python package with all the tooling needed to implement our GitHub Actions-based release process:
python-packaging-demo/
  pyproject.toml
  setup.cfg
  src/
    python_packaging_demo/
      __init__.py
      app.py
  .github/
    workflows/
      release.yml
      publish.yml
    scripts/
      release.py
setup.cfg
I’m gonna skip over setup.cfg
because it’s just a normal setup.cfg file, it doesn’t contain anything relevant to our GitHub Actions-based
packaging solution. The demo package’s setup.cfg is exactly like
the setup.cfg from the Python Packaging User Guide’s packaging tutorial
except that I added a changelog link (shows on PyPI and links to the project’s
GitHub releases page) and a console script entry point (which we’ll be using
later to demonstrate how to implement --version).
One thing worth saying is that your package’s name needs to be unique across all of PyPI, so visit pypi.org/project/YOUR_PROJECT_NAME/ and make sure your name isn’t already taken.
pyproject.toml and setuptools_scm
Here’s the contents of
pyproject.toml:
[build-system]
requires = ["setuptools>=45", "setuptools_scm[toml]>=6.2"]
build-backend = "setuptools.build_meta"

[tool.setuptools_scm]
This is the same as the
pyproject.toml from the Python Packaging User Guide’s packaging tutorial
but with the two parts in bold added. These two additions add
setuptools_scm (following the
instructions in their README).
setuptools_scm extracts the version number from the project’s git tags during
the build process and injects it into the package that gets built.
This means there’s no version number anywhere in the source tree.
There’s no version number in pyproject.toml or setup.cfg or in the Python code.
The git tags are the single source for version numbers.
This is crucial to the packaging scripts we’ll be using below because it means
you don’t need to create and push a git commit in order to do a release.
You just need to create a new git tag.
And GitHub does that for you when you create a GitHub release.
setuptools_scm should be a solid dependency: it’s mentioned in the Python Packaging User Guide, it’s owned by the Python Packaging Authority on GitHub, at the time as writing it’s on version 6.4.2, its been around since 2010 and it’s still actively maintained.
Create a PyPI API token
The publish.yml workflow below needs a PyPI API token to upload releases of
your package to PyPI.
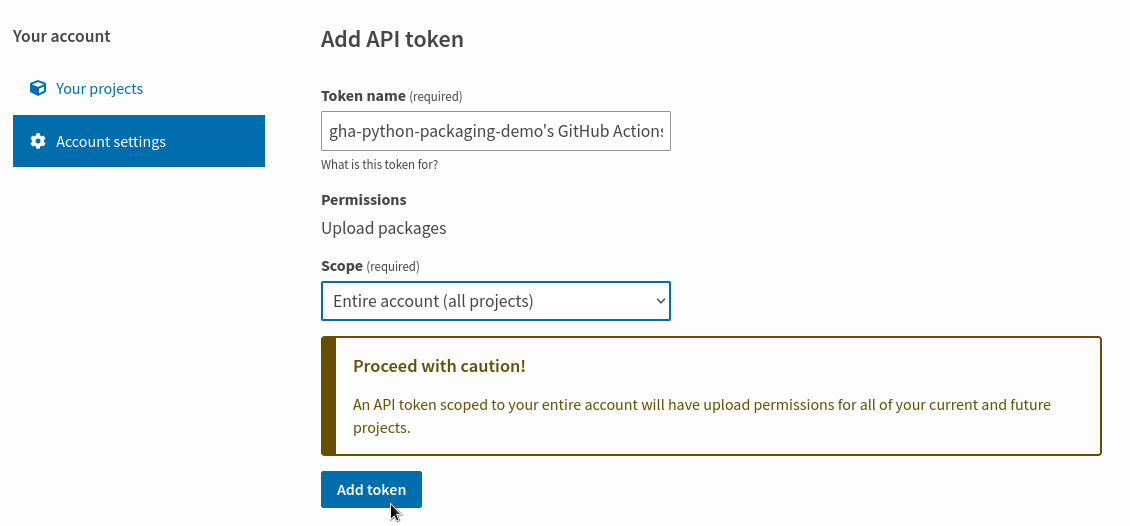
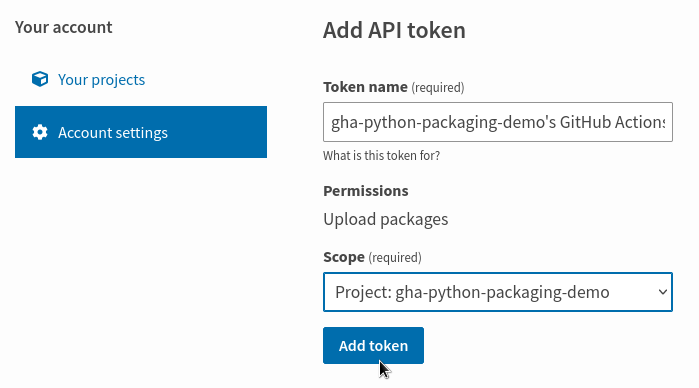
Create a free PyPI.org account if you don’t already have one, log in, go to your account settings, and go to the Add API Token page. You need to create an unscoped API token. You can’t scope the API token to the project yet because the project doesn’t exist on PyPI yet so it doesn’t appear as an option in the scopes dropdown. You can replace the token with a scoped one after publishing the project’s first release.
Add the PyPI API token to the GitHub project’s secrets
You need to add the PyPI API token to your GitHub project’s secrets to make it
available to the publish.yml workflow.
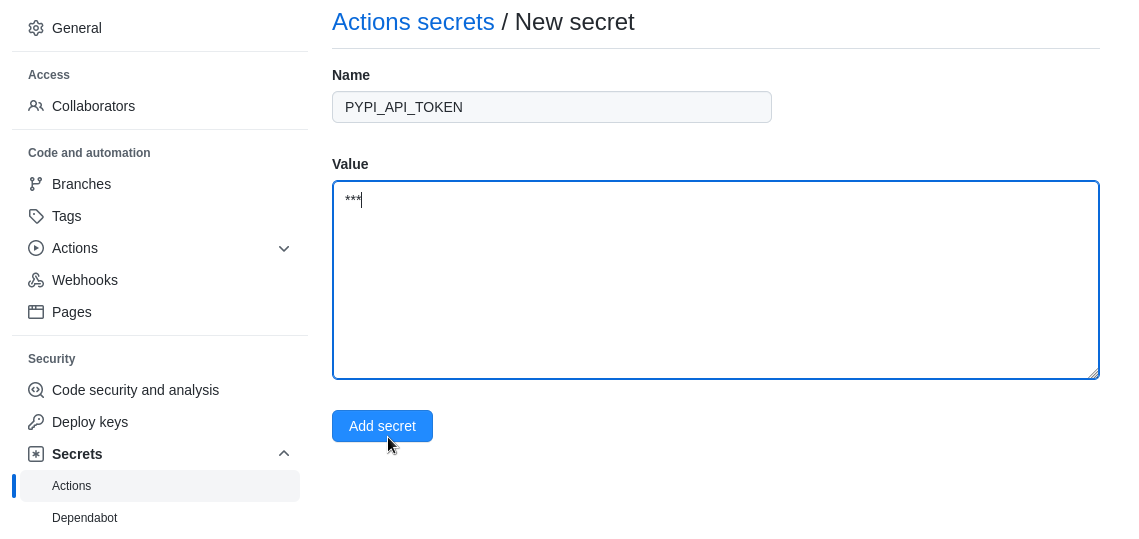
Go to the GitHub project’s Settings tab, go to
Secrets → Actions, and click
New repository secret.
Enter PYPI_API_TOKEN as the name and paste in the PyPI API token as the value
then click Add secret:
The publish workflow
publish.yml
is a GitHub Actions workflow that triggers whenever a GitHub release is
created. It builds the Python package and uploads it to PyPI. It’s 17 lines:
name: Publish to PyPI.org
on:
  release:
    types: [published]
jobs:
  pypi:
    runs-on: ubuntu-latest
    steps:
      - name: Checkout
        uses: actions/checkout@v3
        with:
          fetch-depth: 0
      - run: python3 -m pip install --upgrade build && python3 -m build
      - name: Publish package
        uses: pypa/gh-action-pypi-publish@release/v1
        with:
          password: ${{ secrets.PYPI_API_TOKEN }}
Some notes:
-
This part causes the workflow to be automatically triggered whenever a new GitHub release is published:
on:
  release:
    types: [published]
See Events that trigger workflows in the GitHub Actions docs.
-
The
fetch-depth: 0causes the checkout action to fetch all branches and tags instead of only fetching the ref/SHA that triggered the workflow. This is necessary for setuptools_scm to work, otherwise it wouldn’t be able to find the version number from the git tags. -
The
python3 -m pip install --upgrade build && python3 -m buildis what actually builds the Python package. These are the standard Python packaging commands, straight from the Python Packaging User Guide’s tutorial. -
Finally, we use the pypa/gh-action-pypi-publish GitHub Action from the Python Packaging authority to actually upload the built package to PyPI.
The
${{ secrets.PYPI_API_TOKEN }}passes the API token that you added to the project’s GitHub secrets through togh-action-pypi-publishwhich will use it to authenticate to PyPI.
Create the first release
You can now create a GitHub release and it’ll trigger the publish workflow to build the package and upload it to PyPI.
Go to the GitHub project’s Releases page and click the
Create a new release button.
In the Choose a tag field enter 0.0.1 and click
Create new tag: 0.0.1 on publish.
Click Publish release:

Alternatively, instead of using the web interface you can install GitHub CLI on your local machine and run:
$ gh release create --repo seanh/gha-python-packaging-demo --title "First release!" --notes "This is the first release!" 0.0.1
Either way publishing a release will trigger the publish.yml workflow and the
package will be built and uploaded to PyPI. You can browse to the Publish to
PyPI.org workflow on the project’s Actions page and view
the logs.
You should also be able to browse to the project’s release history on PyPI and see that the package release has been uploaded.
Replace the PyPI token with a scoped one
Now that you’ve published the first release the project will start appearing in
the list of scopes when creating an API token on PyPI. You can go back to your
PyPI account settings, delete the unscoped token, create a new token scoped to
the project, and update the value of the PYPI_API_TOKEN GitHub secret with
the new token.
That’s it!
From now on each time you create a new GitHub release using either the GitHub web UI or GitHub CLI your Python package will be built and uploaded to PyPI.
You could stop here
We’ve gotten as far as being able to create a GitHub release with either the
web UI or GitHub CLI and having that release be automatically built and
published to PyPI. GitHub can even generate the release notes for us. And all
we needed was setuptools_scm in pyproject.toml, a 17-line GitHub Actions
workflow and a PyPI API token in the project’s GitHub secrets. This is really
very simple and you could just stop here and keep using it.
But having to manually enter the version number for every release could be error prone, especially if you release a lot of packages. It’d be nice if GitHub CLI could generate the version number for you. Until then, we can implement that ourselves by adding just a little more code…
Automatically generating the next version number
The release.py script
release.py
is a short Python script that calls GitHub CLI to create new releases with
auto-incrementing version numbers and auto-generated release notes. If the
project doesn’t have any releases yet it’ll use 0.0.1 as the first version
number. Otherwise it’ll +1 the patch number of the last release: 0.0.2,
0.0.3, and so on.
Make sure you mark this script as executable:
$ chmod u+x .github/workflows/scripts/release.py
As long as you have GitHub CLI installed you can run this script locally. It should be compatible with your operating system’s version of Python and it doesn’t have any dependencies, so it should just work:
$ .github/scripts/release.py
https://github.com/seanh/gha-python-packaging-demo/releases/tag/0.0.3
And of course creating a release with this script will trigger the publish workflow to upload the package to PyPI, just like creating a release in the web interface or by using GitHub CLI would do.
If you want to increment the major or minor version number you have to create a
release manually to do that, then you can go back to using release.py and
it’ll start generating patch numbers on top of your new major or minor numbers.
(It would be easy to add --major and --minor arguments to release.py if
you want to be able to use it to generate major and minor releases as well.)
The release workflow
If you want to be able to run release.py on GitHub Actions you need to add a
workflow for it.
release.yml
is a 12-line manually-triggered workflow that runs the release.py script on
GitHub Actions:
name: Create a new patch release
on: workflow_dispatch
jobs:
  github:
    runs-on: ubuntu-latest
    steps:
      - name: Checkout
        uses: actions/checkout@v3
      - name: Create new patch release
        run: .github/scripts/release.py
        env:
          GITHUB_TOKEN: ${{ secrets.PERSONAL_ACCESS_TOKEN }}
Notes:
-
The
on: workflow_dispatchmeans that this workflow never runs automatically, it can only be triggered by the Run workflow button:
-
The
${{ secrets.PERSONAL_ACCESS_TOKEN }}passes a personal access token through to GitHub CLI to use to authenticate to the GitHub API.
To get this to work you need to create a GitHub personal access token and add it to the project’s GitHub secrets.
Why not just use GITHUB_TOKEN?
The normal way to use GitHub CLI from GitHub actions would be to just use the
${{ secrets.GITHUB_TOKEN }}
that GitHub makes available to actions by default.
That won’t work in this case because we’re counting on the GitHub release that
the release workflow creates to trigger the separate publish workflow, and
events triggered when using GITHUB_TOKEN don’t trigger new workflow runs.
So we have to use a personal access token instead.
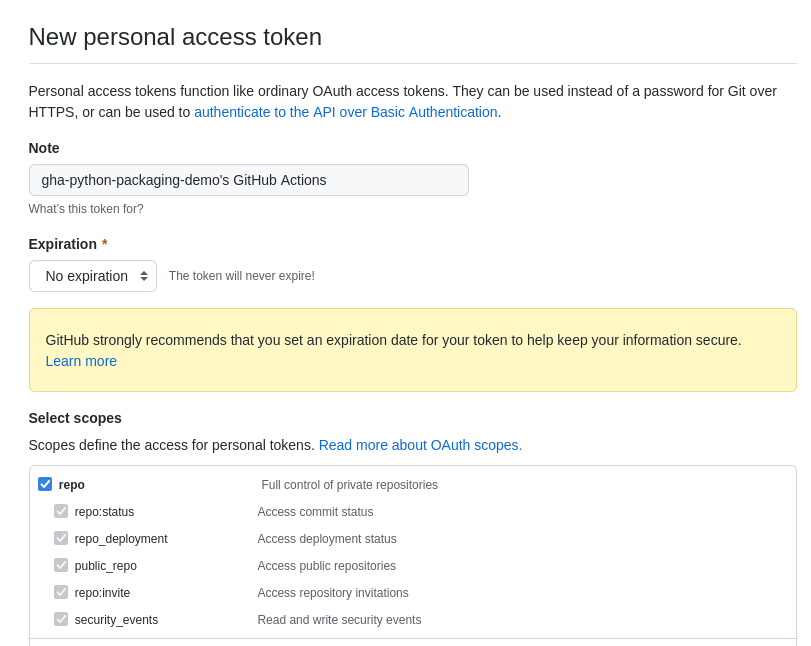
Go to your GitHub account settings, go to Developer settings → Personal access tokens, and click Generate new token. The token needs to have the repo scopes but doesn’t need any of the others.
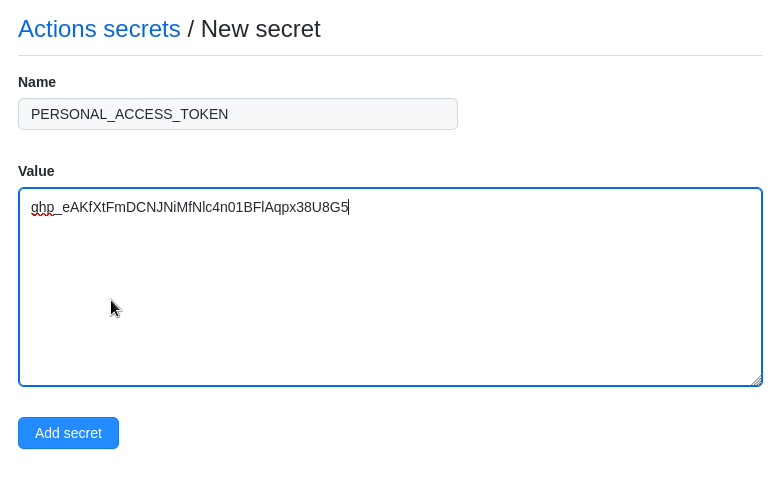
Then go to the project’s GitHub Actions secrets and create a new secret named
PERSONAL_ACCESS_TOKEN with the value of the token you just generated:
With the personal access token in place you can now trigger the release workflow from the project’s GitHub Actions page. Go to the Create a new patch release workflow and click the Run workflow button:
When the release workflow finishes there’ll be a new GitHub release in the project and a new run of the publish workflow will start. When the publish workflow finishes there’ll be a new release on PyPI:

You just generated a new version number, created a GitHub release, built your Python package, and uploaded it to PyPI with a single click of a Run workflow button!
The --version command
What if you want to add a --version command to app that prints the version
number? How can you get access to the version number from the Python code?
You just call importlib.metadata.version(). Here’s the relevant code from
app.py:
import sys
from argparse import ArgumentParser
from importlib.metadata import version


def entry_point():
    parser = ArgumentParser()
    parser.add_argument("-v", "--version", action="store_true")

    args = parser.parse_args()

    if args.version:
        print(version("gha_python_packaging_demo"))
        sys.exit()
If you install gha-python-packaging-demo and run
gha_python_packaging_demo --version it’ll print the version number:
$ pipx install gha-python-packaging-demo
  installed package gha-python-packaging-demo 0.0.6, installed using Python 3.10.4
  These apps are now globally available
    - gha_python_packaging_demo
done! ✨ 🌟 ✨
$ gha_python_packaging_demo --version
0.0.6
What if publishing to PyPI fails?
If a run of the publish workflow fails you’ll be left with a release on GitHub
for which you don’t have a corresponding version on PyPI. You could just delete
the release from GitHub (using either the delete button on the releases page or
GitHub CLI’s gh release delete command) and try again. But you could also
just browse to the failed run of the publish workflow in the Actions tab and
re-run it. This run of the workflow is bound to the GitHub release that
triggered it, so re-running the workflow will try again to build and publish
the same release. The Re-run all jobs button will do (the workflow
only has one job) or there’s also a Re-run this job button on the
individual job.
What about tests?
There’s nothing in the demo to prevent broken code from being uploaded to PyPI. The demo app doesn’t even have any tests. This shouldn’t be difficult to fix: just have the publish workflow run your tests before uploading to PyPI.
Known issues
setuptools_scm causes all git-tracked files to be included in the sdist
If you download one of the source dist packages from PyPI and open the
.tar.gz file you’ll see that it has a lot of unnecessary files in it:
the .github directory (containing the GitHub Actions workflows),
the .gitignore file, etc. Those files don’t need to be and shouldn’t be in there.
This is a known issue with setuptools_scm:
using setuptools_scm causes all git-tracked files to be included in the sdist
(thankfully the .git directory itself isn’t included).
There’s nothing we can do about this (a MANIFEST.in file won’t work) and it doesn’t really matter:
the files don’t cause any problems being there.
setuptools_scm misbehaves if a commit has multiple tags
If you have more than one version number tag attached to the same commit setuptools_scm won’t always pick the right tag (the newest one) to be the current version number. This can cause problems. For example if one of the version numbers has already been published to PyPI and the other hasn’t the publish workflow can end up trying to publish the already-published version number and getting an error from PyPI.
This is an edge case (why would you try to release the same commit twice with two different version numbers?) so it’s probably not important.